Wednesday, July 21, 2021

Finishing and Fixing III

Since my last post, I've gotten a few more projects done.

50 for fifty

One of my 50 for fifty goals was to pick up cross stitching again.  I'd cross stitched for years, but when my move to Colorado came up, I didn't have room for any of my supplies or printed patterns.  I did, however, manage to save a few pattern files to disc.  I found a relatively simple pattern, bought the supplies, and got to work.

There are a few errors in it (name one of my projects that doesn't have errors) but I'm really pleased with it.  I learned a couple of things in this process.  First, I learned that I could actually still do this craft (the patterns are small and not always easy to follow).  Second, I learned to check my receipts.  Embroidery floss at Hobby Lobby is 60-cents each color roll, but for some crazy reason, it rung up the set I bought for this project at $1.89 each!  That's a no-no.

More Parties

Jen came over for a make-it party.  I really like the colors she chose and she did and excellent job.

Emily and I went to Painting With a Twist, our local paint-and-sip.  So. much. fun.
Lord willing, I would really like to go back and paint with them again.

Apartment Decor: Got the "stoop" ready for summer. 


A Fun Giveaway

I did a fun giveaway over on my Facebook page.  Congratulations to Janet Butler-McGhee from Talladega, Alabama for guessing the winning number.  She won the latest wreath I've made:

If you haven't "liked" my Facebook page, be sure to go on over there and "get 'er done."  I plan to do more giveaways in the future, plus post more items for sale and opportunities to help some charities.

I made this for fun and it became a blessing for someone.

Apartment Decor and Another Dollar Tree Challenge

I am a big fan the YouTube channel She's So Craftdee, but had never tried any of her projects until now.


Here's my version of the tray:


I bought the three pans and two glass candlesticks from the Dollar Tree.  I constructed the tray with some high temp hot glue and E-6000 adhesive.  After the glue cured, I spray painted it with Rustoleum 2X Paint and Primer in the color "grape."

It matches my bathroom and vanity area nicely, and I have easy access to the items I use frequently.  Another step toward having my bathroom/vanity completely decorated...ah, but not yet.

Stay tuned for my next round of projects, messes, and other fun stuff.

Sunday, May 16, 2021

Finishing and Fixing II

Yes, I know it's been a hot minute since my last post.  Cut me some slack, I've been just a tad bit busy with commencement, getting my home office area ready for a more permanent situation, and of course, crafting.

50 for fifty

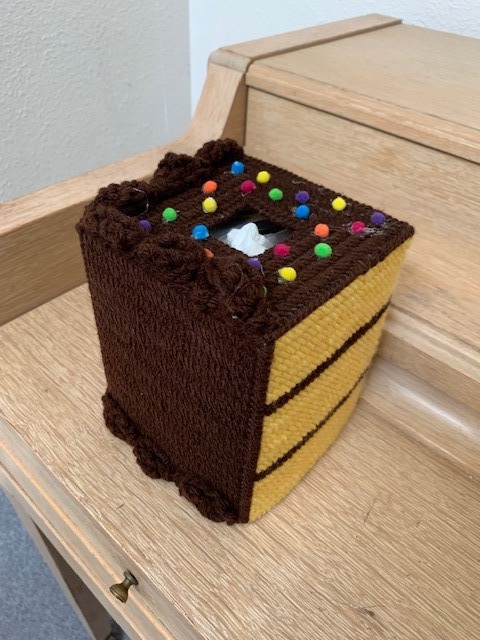
One of my 50 for fifty goals was to pick up plastic canvas crafts again.  When I moved to Colorado, I started completely over with my craft supplies (except my sewing machine and some of my books).  One that fell by the wayside was plastic canvas.  To be honest, I wasn't even sure that craft stores sold plastic canvas anymore (I can't get supplies or patterns for other crafts I used to do).  Fortunately both Hobby-Lobby and Wal-Mart carry plastic canvas, so I purchased a package of seven-count canvas and some yarn (those blankets and baby booties wiped me out).

The first thing I made was a plastic canvas version of this crochet pattern for a boutique-style tissue box cover: http://www.tissueboxbakery.com/2013/11/29/free-pattern-yellow-cake-with-chocolate-frosting-red-heart-soft-deborah-norville-everyday-worsted/. I made it as a present for a friend who likes to bake.  I made two unsuccessful attempts at this pattern.  Despite changing hook sizes and stitch counts, I could not get this pattern to come out right, so I decided to adapt it to plastic canvas.

I did use the instructions from the crochet pattern to make the piped frosting.  If I make this again, the only thing I would do differently is not use hot glue to attach the sprinkles and use tweezers to place them more accurately.  Other than that, I really enjoyed making this birthday present.  

Well, the bug has bitten, so I made a couple of covers for myself.

I used the stitch counts from a plastic canvas pattern in a needlework book in my stash (the pattern was ugly, but the stitch counts helped).  I found the tutorial for the crochet roses on YouTube:

I really enjoyed these and plan to make other projects in the future.

Here are some other projects I've finished since my last post:

This was for one of my neighbors.  It says "welcome" in Polish.


This is another chalk paint experiment.  I coated a salsa jar with chalk paint, painted the design in acrylic paint, then coated it with varnish.  As long as it's never harshly cleaned, it should work just fine as a flower vase.  I consider this a successful experiment.


Another Party

Misty came over for a "make it" party.  She did a great job on her wreath.

 
Apartment Decorating Projects

Finally figured out an aesthetically satisfying way to decorate this long narrow window in my bedroom
 

Found this fat quarter fabric at Wal-Mart and really liked it as an opposite side of the new sofa pillows I made.


Found a use for several torn canvases I had--photo/bulletin boards

Speaking of torn canvases...(yes it's another saga)

I'm a big fan of the Moriah Elizabeth YouTube channel.  If you've never seen it, It's a fun crafting channel.  She has a series called "Art Things to Do When Bored."  One of the suggestions is to re-do an old art project.  Enter exhibit A:


I painted this at Paintology 101 back in 2017.  There's not much to dislike about this painting except the front wheel that looks like it met a telephone pole.  I wanted to try redoing it using a compass to draw a properly round wheel.  Although a compass was required for school, I never learned to use one correctly.  So why not learn now?  I considered painting over the original, but thought it would be too complicated.  So, I made a new one from scratch.

The wheel turned out much better than the first one and I was happy with it...until I framed it, put it in the car to take to someone, took it out of the car only to realize that it had mysteriously gotten torn on something.

So, I went back to my original idea to paint over the old painting...which actually worked.

 
I got this delivered before any other nonsense happened.  At least I got practice using a compass.

Thursday, April 8, 2021

Finishing and Fixing I

In my last post, I finished up my Get 'er Done challenge by finally completing a painting I started more than a year ago.  This, unfortunately was not the only project I left undone for an inordinate amount of  time. 

Sample courtesy of Paintology 101

Y'all know that I miss my girl Donna from Paintology 101, a paint and sip from back home, and I frequently "steal" ideas from whatever her painting classes are working on (she doesn't care; she misses me too).  A while back, her class did this decoupage painting (see sample above).  I'd never done this type of decoupage before so I got out my homemade Mod Podge, an old book that ALREADY had pages torn and missing when it was given to me, an unused 16x20 inch stretched canvas and some acrylic paint.

Gluing down the torn pages of the book wasn't difficult, but I didn't let them dry long enough before trying to put the top coat of glue on, so some of the paper pieces shifted and had to be cut off or glued down again.  

After putting down the base coat of paint, I hated it.  I tried to make the hair like the sample, but it didn't turn out well, plus I made her neck way too thick.  Well, I also painted her butt too big, but she is a sister.  I was also unsure of what I was going to do about the flowers.  Of course, the sample looked good, but I wasn't confident that I could paint the flowers well.  So I ceased production on this project and put it in the closet for nearly a year.  

A couple of weeks ago, I got the project back out and repainted it with more detailed shading.  I reshaped the hair (which hid her football player neck).  Now for the flowers.  I wanted roses, which I don't paint very well...yet, so I hunted for a tutorial on making paper roses (I have some scrapbooking / card making supplies).  I found this:


I loved her simple explanation and caught on immediately.  I made the 3 inch roses in several colors and hot glued them to the painting.

I think she turned out great.  I'm going to hang this in my vanity area.


Now, an episode of "Seven Steps of How NOT to Do a Panting."

Step 1 - Paint a simple bi-color triptych using 3 16x20-inch stretch canvases and hang it over your bed.

Step 2 - Rearrange your room to a more satisfactory configuration which requires moving the triptych that was held together with routinely replaced masking tape from the Dollar Tree.  

Step 3 - Get frustrated with the tape not holding the paintings together and them never hanging correctly and get the bright idea that you're going to screw the canvases together with long screws, though you don't have a drill for proper aligned pilot holes and your battery-powered screwdriver is on its last legs and has less drilling torque than you do with a manual screwdriver.

Step 4 - Get the screw stuck in one of the canvases because you screwed it in crookedly (because you have no drill and your screwdriver sucks) and tear your canvas trying to undo the mess you made.

Step 5 - Get frustrated, throw away the torn canvas and put the remaining two in the closet for months.  Finally get un-frustrated (or at least tired of seeing the big blank wall space over your bed) and hunt for the same paint color you used so your can repair the mess you made, only to discover that FolkArt has discontinued that color (insert cuss word of choice here).  Go to Wal-Mart and Hobby Lobby and buy about 4 different colors of paint trying to match it, only to discover none of them match (insert another cuss word here).

Step 6 - Settle on a color that's close enough.  Go to Harbor Freight (not a sponsor) and buy a new electric screwdriver and a tacker/staple gun.  Pull out the two remaining canvases to reuse them, only to discover that one of them was also torn.  Angrily throw away the torn one, repaint the remaining one plus two new ones, not care that it's not exactly like the one you messed up, staple them together properly and hang them over your bed without incident. 

Step 7 - Relax and enjoy!


Tuesday, March 9, 2021

Get 'er Done Art Challenge: End of Round Two


End of Round Two

For Phase one, look here
For Phase two, look here.
 
During the Christmas holidays (when I was temporarily off restriction), I bought a bunch of decorative mesh.  Even though I made several wreaths and angels as Christmas presents, I still had a drawer full of leftover mesh rolls and small Christmas ball ornaments.  I used up all the ornaments to make angels (getting a jump on Christmas 2021).  I used the leftover mesh and ribbon from a previous "make it" party in a spring wreath for my door.  The mesh around the door is from my Christmas stash.  Even after all this, I STILL have rolls of mesh left.


My friend, Misty came over for a painting party...


...and I took the practice canvas from the party and tried something new.


I turned a few leftover flowers from the unicorn flower pot into magnets. I'd bought the magnets at the Dollar Tree a long time ago and didn't realize that the magnet wasn't removable from the plastic circle they come in.  I won't buy these again--I'll stick with the craft magnets at Wal-Mart or Hobby-Lobby.


Along with my unpainted canvases are several failed painting attempts and paintings that I simply didn't like.  I repainted this over another painting.  I got the idea for the painting from my girl at Paintology 101.


This painting sat unfinished for more than a year.  One day, the idea hit me on how to finish it.  After a couple of hours, I reached the "leave it alone" stage and declared it done.

From the moment I started the painting, I'd planned to hang it over my dresser.  Now the "staging" of my dresser area is complete...pretty much.


If you've been following my 50 for fifty journey on my sister blog, you know that one of my goals was to make 200 pairs of baby booties for Colorado Family Life Center.  I finished all the booties last week and delivered them, along with some newborn diapers and the 12 crocheted blankets I made last year to the center.  Soon after I left, this couple chose a couple pairs of the booties.  Blessings to their new little one.


OK, so this is more of a tool than a craft supply, but I bought new blades for my paper cutter over Christmas break and just now got around to changing them out.  When the cutter shreds the paper instead of cut it, it's time for a change.  I don't know what the hold up was; they take less than 5 minutes to change.  Anyway...may many card blessings come from these new blades.

Well, that brings this round to an end.  I have made a significant dent in my craft supply/unfinished project pile...and I'm officially out of yarn!  I'm done with my courses, so I have a lot more time to craft and create.   There are still things left that I will continue to finish up and and post, but I'm officially off of craft restriction.  The goal is to use things as I purchase them to avoid the backlog I had before. 

Tuesday, February 16, 2021

Get 'er Done Art Challenge: Round Two, Phase Two


Round Two:  Phase Two

For Phase one, look here
 
This phase was a painting frenzy for me.
 
 
I've still got several canvases--some started and some still in the package-- in the closet just begging to be painted. This is an alternate version of the painting I did at the now closed Pinot's Palette in Westminster.  It's a sample for a couple of upcoming painting parties.  I had to make another sample because (1) it had been so long since I painted the first one I needed to see if I remembered how to do it and (2) I had to adjust it from a 10 x 30 inch canvas to a 12 x 24 canvas, plus find a mix of paint that equated the color from Pinot's (I have no idea where they got either the canvas or the paint).  Like all my successful samples, it will go on my party wall (more on that to come).
 
 
I liked that painting so much that I decided to make a brush/pencil holder (a flower pot) and a box for my small ribbon spools (an empty dishwasher tab container) to match.
 
One of the big "things" among YouTube crafters is chalk paint.  Chalk paint is essentially water-based acrylic paint with a grainy substance (usually finely ground chalk or talc) mixed in.  Most of the crafters use it on furniture and decorative items because it is an easily distressed finish.  However, that's not what I wanted it for.  (I'll give my take on distressed painting later.)  I saw that it could be used on a variety of surfaces like wood, glass, cardboard, and metal.  I mentioned last post about painting on flower pots, but this time, I decided to paint pizza pans.  Why?  A while back, I saw a video on This Southern Girl Can featuring a wall hanging made of florals and other decorative items attached to a pizza pan. I was inspired to try turning the pans into a canvas. I bought the pans, then they sat in my pile of supplies for months.  This phase, I finally got around to them.
 
Before applying the base coat of chalk paint, I lightly sanded the pan to give "tooth" to the metal so the paint would stick.  I believe I applied two coats.  After letting it cure overnight, I did the lettering and artwork with acrylic paint. After letting the artwork dry, I sealed it with a couple of coats of varnish.  I also used E-6000 glue to attach a hanger to the back.  They turned out better than I expected and I think I'm hooked.

BTW--I also base coated the flower pot and dishwasher tabs container with the chalk paint also.  I think I like this stuff. 

Well, see y'all next time.

Monday, February 8, 2021

Get 'er Done Art Challenge Round Two, Phase One


Round Two:  Phase One

To see all of round one...
For week one, look here
For week two, look here
For weeks three and four, look here
For weeks five, six, and seven, look here.
For the end of round one, look here
 
Noticed a change on this blog? I finally made my sign/logo the way I wanted to all along.  I was never happy with the old one that I painted, but I made it do.  Thanks to a leftover 12x24 inch canvas, some craft supplies I don't use, and my friend Diana's Cricut, I now have a logo I can proud of.


I was given some craft foam a year or two ago but really didn't know what to do with it.  Quite honestly, I still don't know what it's supposed to be used for, but I did find out that it could be painted.  I cut out some flowers, painted them and glued some leftover sparkly gems in their middles so they didn't look so flat. I also cut out a horn and painted it and added leaves for accents.  BTW-- all the gluing was done with E-6000 glue (for permanent hold) with a dab of hot glue (for immediate hold).  I bought a few terracotta pots when I was off restriction during the holidays.  Along with the craft foam, this was my first time using chalk paint.  I used it as the base coat for the pot and painted the face over it in acrylic paint.  After a few coats of varnish (inside and out), it seems to be holding up well.  I'm not sure if this post can handle being outside, but for should be fine for an indoor plant.  I need to use the chalk paint on some other items before I can give a final verdict on it.
 
The only supplies I had to buy was for my "make it" party with Miss Emily.  This was her first time making a decorative mesh wreath.  She did an awesome job.  BTW--little "Chickie" in the middle of her wreath is one of my mini paintings.  It will be featured in this year's Easter card collection.  Stay tuned to see it in March.


My sample wreath.