Monday, November 23, 2020

Get 'er Done Art Challenge: End of Round One


End of Round One

For week one, look here
For week two, look here
For weeks three and four, look here
For weeks five, six, and seven, look here.
 
This has been quite the productive few weeks...
 

I forgot to mention these in my last post.  I make these plastic ring ornaments every year and had some rings left from the last time I made them.  Since I couldn't find the sparkly yarn I usually make them with, I jazzed them up with jingle bells.   


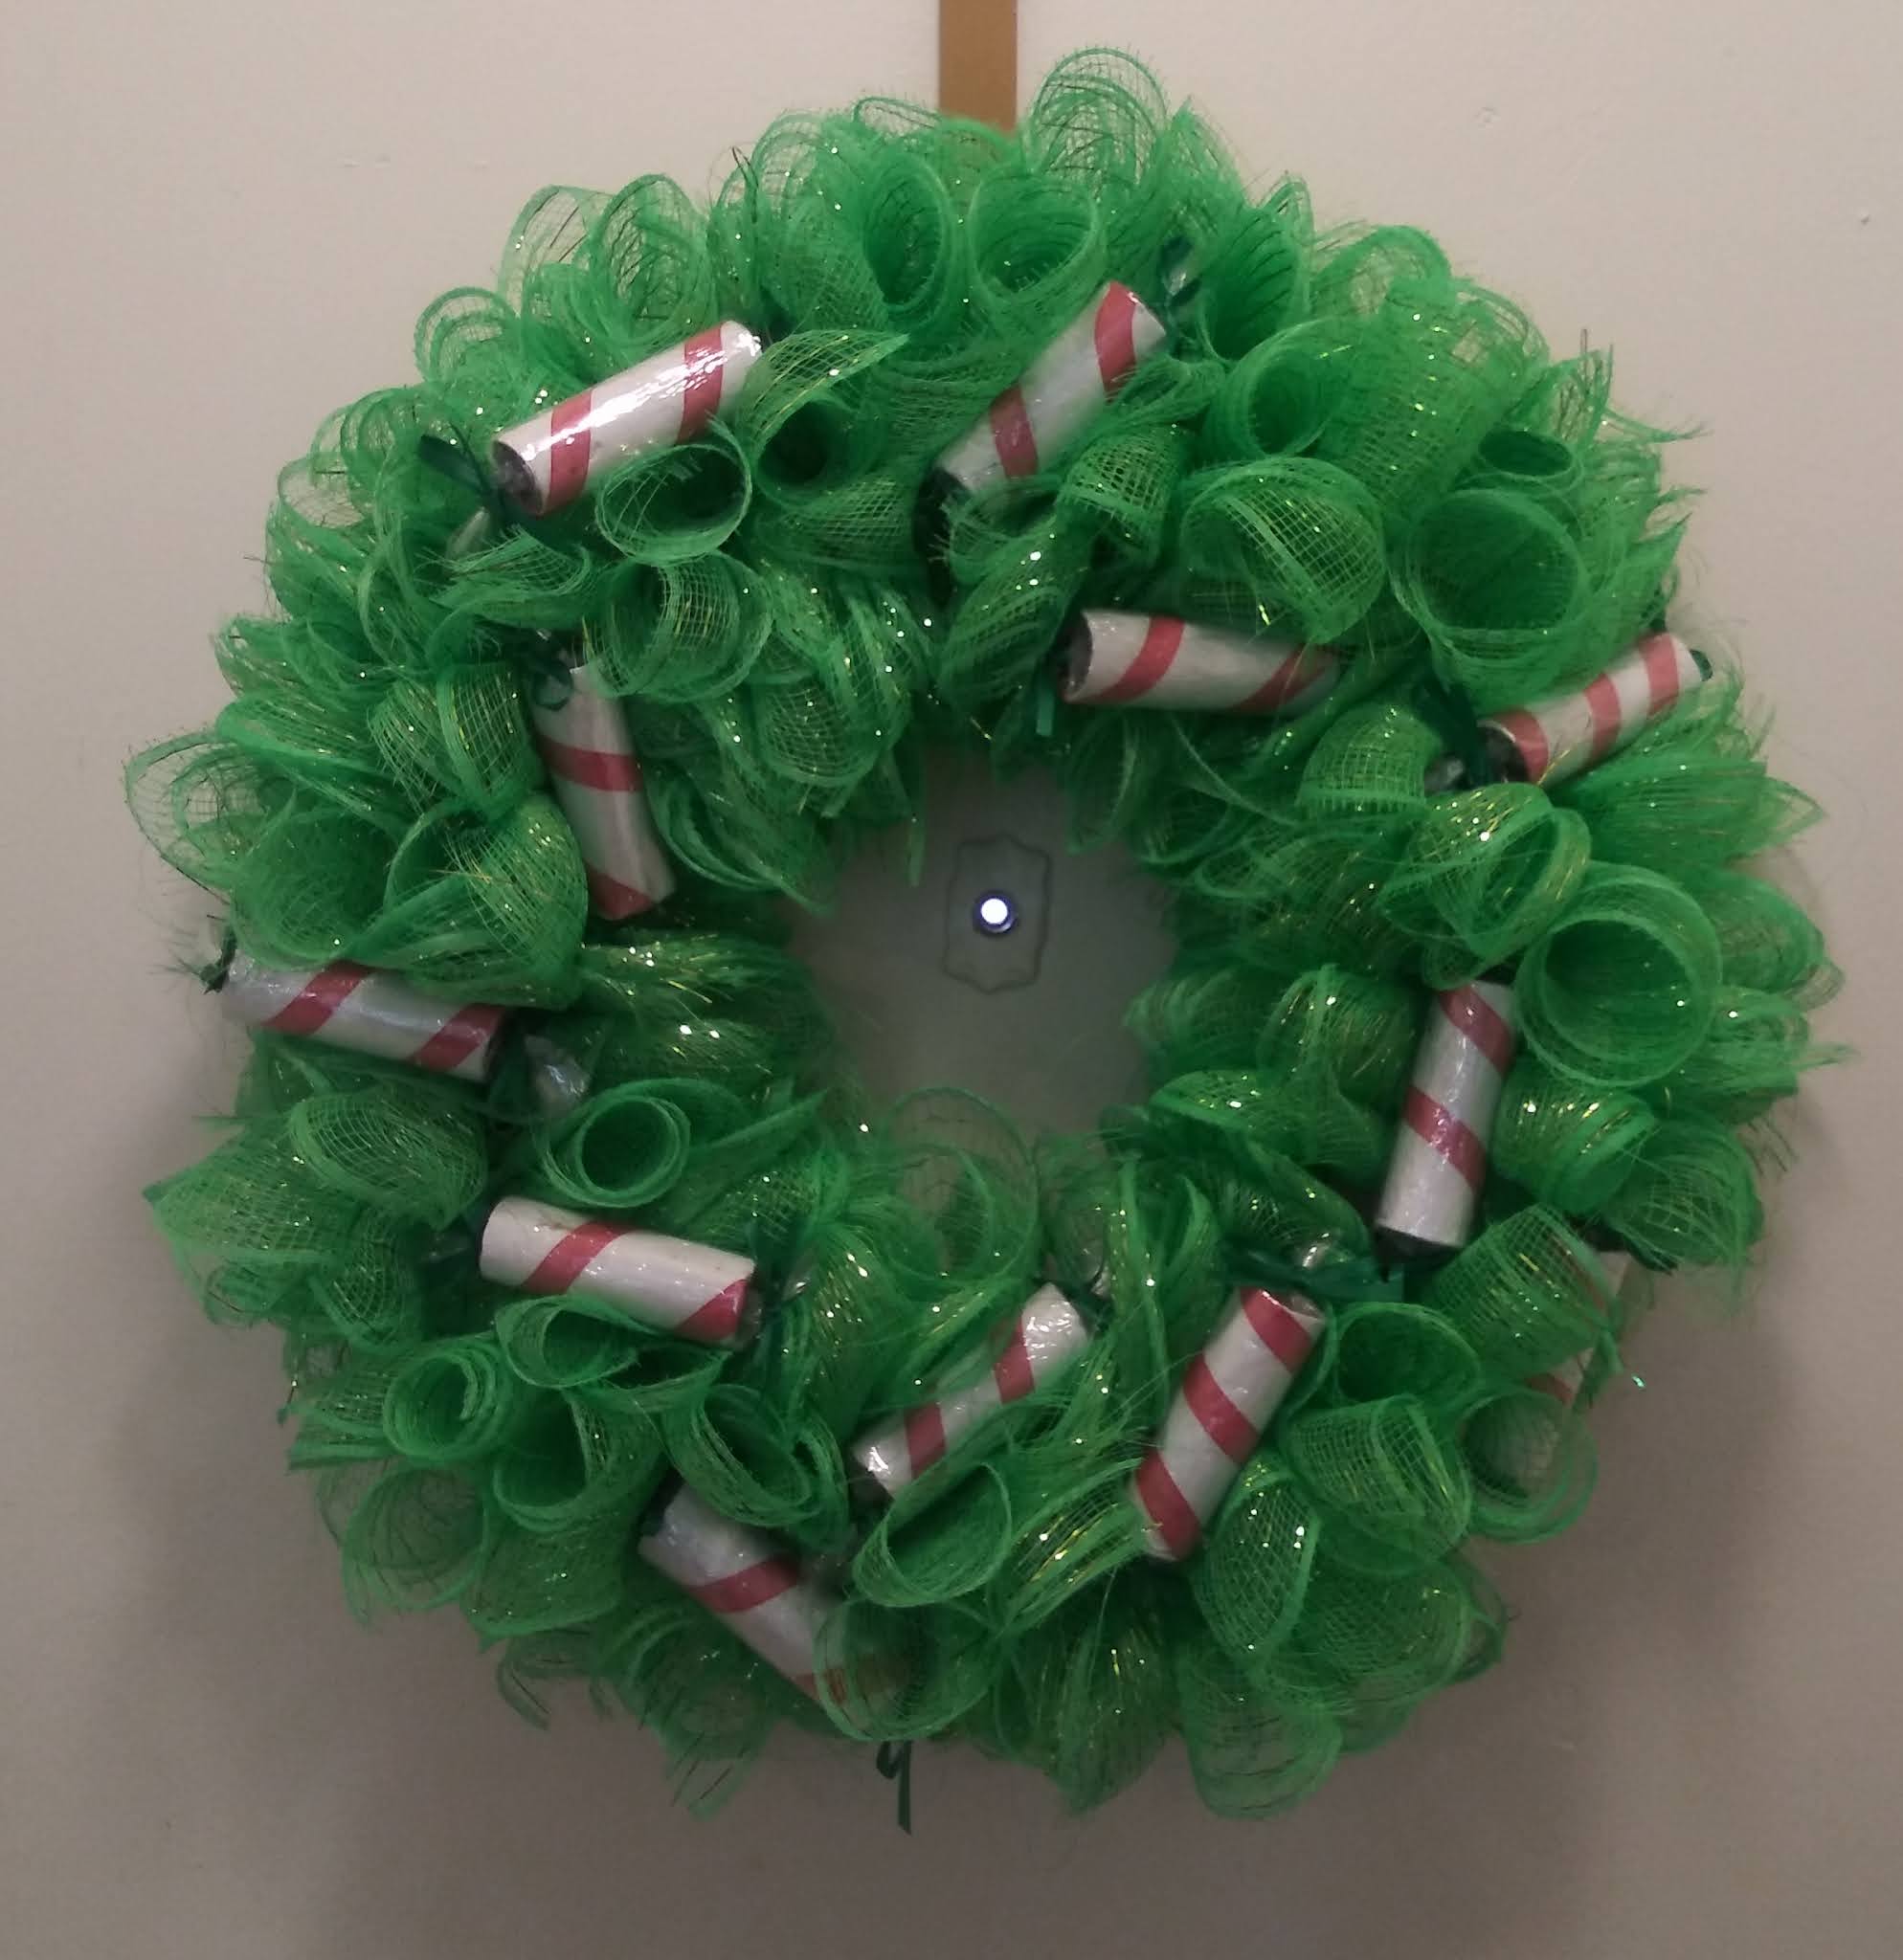
I had all the pieces of this left over from other projects.  All I needed to purchase was a couple strands of garland to wrap the wreath form.
 
I also managed to get some paintings done.


These are the last two blankets in my goal of making 12 for Colorado Family Life Center.  They were both made with leftover yarn from my stash.  The star quilt was made from yarn left from the projects I've done this year.


I even worked in a little make-it party with Miss Emily.


I also finished my fifth challenge in my Dollar Tree Challenge.  The post is here.
Well, let's see what kind of holiday mischief we can get into.  See y'all later.

Sunday, November 22, 2020

Dollar Tree Challnege #5


Not a sponsor

I know that Thanksgiving is this week and Christmas decorating will quickly follow after, but I had one more fall project I wanted to add to my autumn table display...


So here's my version of this craft.


I'd bought the Tumbling Tower blocks a few months ago before the crafters started hoarding them all.  (Y'all stop!)  I've just now made time to make them.  I like that these blocks are so small that the project can be held together with high temperature hot glue.  However, if you have kids or pets and want to make these, I'd suggest a stronger glue like E-6000.

Well, with that, I've completed my Dollar Tree Challenge from my 50 for fifty list.  Will I do more challenges?  Absolutely.  Happy  Thanksgiving, y'all.


So, what do y'all think?

Sunday, October 25, 2020

Get 'er Done Art Challenge: Weeks 5. 6, & 7


Weeks Five, Six, & Seven

For week one, look here
For week two, look here
For weeks three and four, look here.
 
Yes, I know it's been three weeks since I posted, but I actually wanted to have something finished to show you.
 
 
I know I've made a lot of wreaths, but a potential customer wanted a red truck wreath.  Unfortunately, it was not what they wanted.  Oh well.  UPDATE:  Someone else bought this wreath in December. YAY!

 
I've made this particular pattern several times, but not in these colors.  It's called "baby crayons" and it's from an old needlework book I've had since I started crafting.  This is a baby shower gift.  I really like how these colors worked together.


I had a lot of mesh left over from the wreaths and ribbon I've been making and wondered what I was going to do with it.  I've been watching videos I hadn't seen from the crafters I follow on YouTube.  Well, Miss Amber from This Southern Girl Can had the perfect use for my leftovers.  I did have to get some ornaments for the head (which is not a violation of the rules), but I had everything else left in my stash.

OK, y'all.  I'm going to finish round one of this challenge the week of Thanksgiving, then suspend it to get ready for Christmas.  Once my Christmas crafting is over, I will resume the challenge and put myself back on restriction.

See y'all next time.

Sunday, October 4, 2020

Get 'er Done Art Challenge: Weeks 3 & 4


Weeks Three and Four

For week one, look here
For week two, look here
 
Weeks three and four were not very productive. 
 
This wreath was the only thing I finished these past two weeks.  I got the idea for the candy pieces from this video from This Southern Girl Can:


I still have leftover ribbon, cardboard cores, and plastic, so I think I'll make some more of these later to use as ornaments or decorations for other art pieces.

I did make a few pairs of baby booties. I'm up to 65 pairs in my 200 pair goal in my 50 for fifty challenge. 
 
The rest of the past two weeks have been pitiable attempts to plug away at some unfinished projects.  True, I had some extenuating circumstances (illness, a huge project to finish, etc.), but I still felt like a lazy slob.  I've been dragging myself out of bed and doing what was absolutely necessary (thank God I'm currently working from home, so I didn't burn up any sick leave and nobody has to know what I smell like without a shower). Each day, I thought I was getting better, but my body said otherwise. Even today, I had a great morning (church was great and seeing friends was fun).  As I headed home, still feeling great, I thought of all the things I could get caught up on.  Then, promptly went home and crashed for the rest of the day.

I've decided to extend my restriction for another month.  So let's see if I can get myself well enough to get some things DONE!
 
Well, see y'all next week.

Sunday, September 20, 2020

Get 'er Done Art Challenge: Week 2

Week Two

For week one, look here

After such a productive first week, I knew I'd slow down week two.  The first week I had the benefit of a holiday and no class assignments due.  This past week, it was back to the normal grind, plus I felt like nine miles of bad road all week.  However, I did finish a few things:
 
This doily is a Red Heart pattern called "Heart's Desire." The pattern is here.  It had sat unfinished for a couple of months.  The pattern isn't difficult, so I'm not sure what the hold up was.  This was my first time stitching a doily to a canvas. It was stitched with size 3 cotton and mounted to a 12x16 canvas.
 
 
This baby afghan is called "Kitties in a Row" by Beverly Qualheim (the pattern is here).  I still couldn't find a new pattern to work with, so I went back to this familiar favorite.  I used up one skein of each of the three colors from in my stash for a crib sized blanket.  I hope to make a larger one in the future.
 
My niece, Cassandra gave me some beautiful rolls of decorative mesh from Hobby Lobby when I was home for mama's funeral.  I had the wooden plaque and wreath form in my stash, so I decided to make this wreath for my living room.  It will head a photo wall of family pictures
 
I also make some progress on a few other things that hopefully I'll finish this week.

Well, let's see what this week will hold.  See y'all later.

Sunday, September 13, 2020

Get 'er Done Art Challenge: Week 1

In my last Daybook (here on my sister blog), I talked about how I've got too many incomplete craft projects and supplies piling up in my living room.  I decided to put myself on restriction: I will not purchase any craft supplies for a month or until I run out of projects (whichever comes first). The only exception is if I need to buy something to finish what I'd started (sometimes I do miscalculate the amount of supplies needed).

So...

Week One

This first project was really simple, but I'd let it sit undone for months.  I use these clothespins as tiebacks for my living room curtains.  The "naked" pins didn't look right with my curtains, so I painted them to match.

I'd made one of these for someone else and used the leftovers to make one for me.  This is part of my fall table display that's part of my Dollar Tree Challenge.  The table isn't quite done yet, but I will post pictures upon completion.

Diana gave me this piece of scrap wood last year and I knew what I wanted to do with it, but wasn't sure how.  I found the hooks at the Dollar Tree.  It took me two tries to hang it.  Word to the wise, use the Command hook and loop strips designed for heavy pictures instead of the hooks.  I bought enough hooks to hold the weight of this, but they didn't make it two hours before they fell off the wall.  They'll get reused for something else.

 
This project was so fun.  I taped off the window paned and painted them (don't ask me how they're still crooked--I measured and measured....).  Then, I attached two of the small trays from the Dollar Tree that I painted with wire and hot glue.  After gluing floral foam inside the trays and Spanish moss to the foam, I cut apart these flower picks from a bunch I got from Hobby Lobby.  I figured since I didn't have a yard and couldn't tend a real window box in my apartment, why not make an indoor one.


Finally finished the latest baby blanket.  This is a shell stitch pattern from an old needle craft book.

This fall wreath was for someone at work.  I'm really getting into these mesh wreaths.

I painted this as a sample for an upcoming painting party and to have a new welcome sign for my front door.  It was the first time I've painted something like this and I had a great time creating it.

Whew!  That was a lot in a week, but we didn't have any assignments due this week due to the holiday, so I had more creative time than usual.  Next week may not be as productive, but we'll see.

Tuesday, August 4, 2020

Dollar Tree Challenge #4


Not a sponsor

While summer breezes are still blowing, crafters and decorators are already creating for fall.  I wasn't going to join in so soon, but I went to the Dollar Tree and...

Well, you know the rest.  I go there for soap and toothpaste and I come out with that, plus a couple of bags of craft supplies.

Anyway...

I saw some fabulous new supplies and decided to try my hand at another mesh wreath:


No, this isn't my new challenge, but it's pretty, ain't it?

In the supplies I bought were some picks (floral stems with stuff on them besides flowers) and a fall leaf garland, plus I had a package of Dollar Tree metal words that Diana had given me.  I had a 12 x 16 practice canvas that I'd painted a few times and a 9-inch grapevine wreath I bought at the thrift store when I first moved here.  It had decorations on it that worked when I first moved but didn't go with my decorating scheme ... now that I have one.  So I took them off.

Voila!  An idea for a mixed media project.


First, I painted the canvas with antique white and a variety of browns to make the background look like wood.  Then, I took the antique white paint and dry bushed it on the wreath to make it stand out more.  I hot glued the wreath to the canvas and reinforced it with a couple of pieces of floral wire (from the Dollar Tree).  I learned that I can safely poke a hole in the canvas with a needle and run the wire through the holes and twist the ends to attach it. I twisted the picks together with floral tape (from the Dollar Tree) and attached them with hot glue and floral wire.  Lastly, I hot glued the leaves and the metal word to the wreath.

So, what do y'all think?

Tuesday, July 21, 2020

Dollar Tree Challenge #3


Not a sponsor
Several years ago, my niece Cassandra started making Deco mesh wreaths and selling them on Facebook.  She offered to teach me how, but life happened and I moved away.  Over the years, I watched several YouTube videos to see if I could get a grasp of the concept.  They looked quite tedious (yeah, I know this is coming from someone who will paint on a 16 x 20 canvas with a brush with 4 hairs in it).

Anyway...

In the winter of 2018, I determined to make myself a mesh Christmas wreath and purchased what I needed, but later chickened out and returned it all to the store.


Chicken Dance GIFs - Get the best GIF on GIPHY

Yeah, I know. Leave me alone.

Fast forward to last month when my sister Clara and I decided to keep our tradition of starting Christmas crafting in July and planned a crafting day over video chat.  I decided I was going to tackle this project since I knew sis would be encouraging and honest all at the same time.  If it looked a hot mess, she would tell me.  So, this weekend, we got on video chat and had a good old hen party (what's with all the chicken imagery?).

And here it is...


Now, I didn't finish it one sitting.  I got all the mesh and ribbon rolled and attached, but I didn't paint the star and attach it until last night.  Honestly, all of the supplies did come from the Dollar Tree:

Supply List
  • 8 rolls of Deco mesh (5 yards per roll) 4 of each color for a two color wreath.  Most tutorials said I'd only need 6 rolls, but I know me.  Good thing too.  I messed up some of the cuts and had to do them over, so I did use some of the 4th roll of each color.
  • 3 rolls of ribbon (3 yards per roll).  I really should have bought four (I thought I didn't have enough up until the last cluster), but my Dollar Tree only had three of what I wanted. 
  • One round 14-inch metal wreath form.
  • One wooden star (or whatever shape you can find--this was the last star like this at my Dollar Tree) or whatever else you want to put in the middle.
  • 1 pack of chenille stems pipe cleaners (I refuse to be that bougie). There will be some left over.
  • Okay, so I already had acrylic paint, but some Dollar Tree stores do sell it.

This video from This Southern Girl Can is the tutorial I settled on to learn this technique.  Her instructions were simple and she's just a mess.

Now, I'm hooked and want to make another one.

Wednesday, July 1, 2020

Dollar Tree Challenge #2

Not a sponsor

One of the YouTube crafters my sister introduced me to is Amber Riley from This Southern Girl Can. She's an awesome creative from North Carolina.  Her specialty is Dollar Tree crafts.  This past week, she did a simple Independence Day craft that looked fun and I just had to try it.  Here's her video explaining the craft:


The only things I needed to buy were the picture frame and the bag of Styrofoam stars. I already had clothespins, craft paint, and hot glue. I haven't figured out an appropriate space outside my apartment complex where I can spray paint, so I hand painted the clothespins.  I liked the color of my picture frame, so I didn't paint it.  I also had some jewels and metal letters in a box of craft supplies I was given a while back that I used on the plaque.

 
The only things I would do differently if I made this again are 1) I'd paint the inside of the frame backing since the pins don't fit perfectly (she warned about that) and 2) I would have painted my stars differently.  All in all, I like it.  Maybe next year, I'll get ahead of the game and have more decorations for the holiday.  

Thursday, June 25, 2020

Dollar Tree Challenge #1

Not a sponsor

Part of what I've been doing during quarantine is watching some of the YouTube crafters my sister, Clara, introduced me to.  Many of them know how to take inexpensive items from the Dollar Tree and create gorgeous crafts, art pieces, and home decor items.   This inspired me to take up the challenge and see what I can make.  So, at least once a month, I'll attempt a project and let y'all know how it went.

When I first moved into my apartment, I was given a gorgeous set of canisters that were the perfect size for every day necessities like coffee, and salt for use and display.  However, I've needed some larger ones for things like flour and sugar for baking.  When I started drinking Link's Smoothie, I saved the protein powder containers for use as canisters.  The only problem is, they were ugly:


See?

I know they're just in the cabinet, but I want to enjoy using them, so I decided to use my first Dollar Tree challenge to decorate these.  I purchased two rolls of decorative ConTac paper, a 4-pack of wooden chalkboard labels, two 3oz bottles of Aleene's Tacky Glue, and a pack of sponge brushes. I cut the paper to fit the container, removed the adhesive backing, and attached it.

Lesson one:  No matter how straight you cut the paper, it's hard to line it up on something round.

Lesson two:  Wooden labels don't bend, so they can't be attached to a round surface.  I ended up scanning them and printing the labels on white cardstock paper.  I used the wood labels for something else.

Lesson three:  When you can't find ModPodge at the Dollar Tree, mix water with white glue.  It's the same thing (pretty much).

I got out my acrylic paints and decorated the printed labels with the name of what the canister will contain.  Once they dried, I used my homemade ModPodge to glue and seal the labels to the canister.


Much better!

I haven't even used one complete roll of the paper, but I'm saving it for future canisters and other projects.

I'd say my first project turned out well.


Monday, June 15, 2020

Quarantine Update

Well hey, y'all.

Just checking it to let you know that I'm sill here!

One bit of good news.  I am now accepting PayPal for payments.  If you wish to purchase something, please e-mail me (link to my e-mail is in the "Order Now" tab on the right) so we can arrange for quantity, color, personalization, etc.  After we've finalized your order, go to PayPal, click "Send," enter the e-mail auntiesworkshop@outlook.com, enter the amount, then chose either "sending to a friend," or "paying for an item or service" (I am incurred a fee for this one).  Then confirm your information.  That's it.

At the beginning of quarantine, my creative mojo was shot into the toilet.  Slowly but surely the creative bug hit and I made a few baby blankets for Colorado Family Life Center.  I started with a couple of familiar patterns to prime to pump:


This is one of my favorite "go to" scrap projects.
"My Daisy Square" pattern by Cindi's Crochet Cubby.  Pattern is here:
https://www.ravelry.com/patterns/library/my-daisy-square---archived

"Pineapple Rose Pillowghan" by Bea Wells (pattern not available on the web anymore)

Once I got the crochet bug, I've been trying some new (to me) patterns:


"Matelasse Afghan" by Priscilla Hewit
Pattern is here: https://www.ravelry.com/patterns/library/matelasse-afghan


"Drop in the Pond Lap Blanket" by Elizabeth Ham
Pattern is here: https://www.ravelry.com/patterns/library/drop-in-the-pond-lap-blanket

I just started new pattern a few days ago.  I'll show you when it's done.

Now that my creativity has been awakened, this weekend, I got to some neglected projects:


These were birthday presents.  The top is a "Color Me" plaque.  I had no idea those even existed.  The second was a blank 12 x 12 wood slat canvas.  It was fun to paint and I plan to paint others.

I think that's enough for now.